Beschreibung vom Hersteller
NomDs7GLRitLwuwktZp273kYf8N33o9gTRKntDAX.pdf
ESP-01S Relay v1.0 1.
1. Description
This ESP-01S Relay based on AI-Thinker ESP-01S WIFI module. It is designed for smart home, Internet of thing and others DIY project. With this smart relay, you will easy to DIY your smart switch to control any device by your phone anywhere. We support the APP and LUA source code. We had upload a demo code in the ESP0-01S, just supply a DC5V power, then you can control it. In the version, we use the GPIO0 of ESP-01S to control the Relay by Hight level.

 32
32
2. Schematic

3. Parameter
- Working voltage: DC5V *Working current: ≥250mA
- Communication: ESP-01S WIFI module
- Transmission distance: the maximum transmission distance of 400m (open environment, mobile phone equipped with WIFI module)
- Load: 10A/250VAC 10A/30VDC, the relay pulls 100,000 times
- GPIO0 of ESP-01S Control the Relay (High level active)
- Product size: 37 * 25mm
4. Usage
1) Hardware connection: Just plug the ESP-01S to the 2*4 pin header after download the code to ESP-01S. Show as below:
2) Power supply Connect a DC 5V power to the GND and VCC.
3) Open your phone WLAN then connect the WiFi ESP8266-XXXX, Power word:12345678
4) Open the ESP8266 Controller.app (Installed it in your android phone before)
5) Set IP Address: 192.168.1.1 than you can control your device via the wifi relay module:


Soweit die Theorie...
Jetzt die Praxis
... es geht erst mal gar nichts!
Wie programmiere ich das Teil überhaupt - JA - es gibt einen Programmiermodus.... ![]()
was ich dann auch im Internet so belegt bekommen habe (DANKE! ... schafft Freizeit aber auch Faulheit)
2 Änderungen sind notwendig, damit überhaupt was passiert:
- R2 muss entfernt werden und
- eine Brücke von 3.3V nach Enable gelegt werden...
http://www.steinhorst.org/esp8266-esp-01s-relay-modul


Dann muss der Chip geflashed werden, die originalen machen überhaupt nichts...
- Arduino GUI installiert und Bibliotheken zugeführt
https://www.heise.de/ct/artikel/Arduino-IDE-installieren-und-fit-machen-fuer-ESP8266-und-ESP32-4130814.html Programm ergoogled:
https://www.instructables.com/id/ESP0101S-RELAY-MODULE-TUTORIAL/
configuriert- festgestellt, dass die eingetragene IP im Originalcode (hier oben isses gefixt) nix zu sagen hat, da das Teil DHCP kann und auch macht - zum Glück man die Daten aber per Intuition aber erkennen kann dank
Serial.print(WiFi.localIP());
- versucht zu programmieren und dabei festgestellt, dass dem 1-EURO-Ebay-Programmier-Adapter der Taster fehlt, um in den Programmiermodus zu kommen:
 versus der von mir erstandenen Version
  (halt ohne Taster)
 - Lötkolben angeworfen und fachmännisch einen Taster eingeklebt
 ...
...

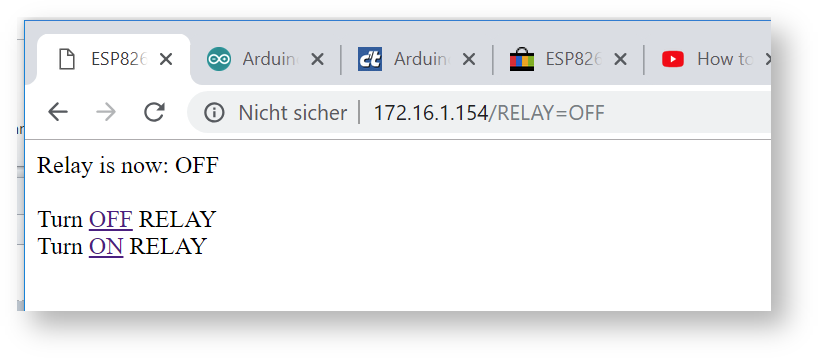
Wenn man das Modul samt Chip jetzt mit gedrücktem Taster in den USB-Port steckt ist das Modul im Programmiermodus... - Programmiert - gesteckt - geht.